Coding 101: Where to Start
This is knowledge and analysis.
There are many different coding languages.
Here, I will talk about some that I am using, and that I recommend.
Before you start anything, you have to have some basic knowledge. First, what is a programming language? It's simply a language, like English or Spanish, that a computer interpreter can understand. Does that mean a computer directly understands what the commands in the program mean? The short answer - no. The code you write gets compiled into binary, which is what the computer can understand. Imagine that you were talking to someone in a foreign country, and you had someone to translate your words so they could understand you. That is essentially what compiling is. So, now that you know what a programming language is, we can get on to learning. In order to make a simple website, you have to know three basic programming languages, which are html, css, and javascript. Before you even start learning these, I recommend that you get familiar with programming. Two great websites are scratch.mit.edu and codecombat.com. These websites can get you familiar to what coding generally looks like. First, what I learned the hard way is to find out what you want, and the technique you want to use. For instance, this website uses graceful degradation instead of progressive enhancement. Unfortunately, I can not teach you all you need to know, but here are 10 basic commands to making a website. These first ones are html.
| <!DOCTYPE html> | This tells the browser that I am using HTML. |
| <head> … </head> | This tells the browser that I am telling it things only it can understand and interpret. |
| <body> … </body> | This tells the browser that this is the content the user sees. |
| <h1> … </h1> | This is used for big headings. Often, this will be used for the title of the page, like on this website. |
| <canvas> </canvas> | This command can be imagined as an artist's canvas. Im my case, I "painted" a blue rectangle above. |
| <header> … </header> | This is the very top of the page. I put my canvas and text in it. |
| <div> … </div> | This is where you put other code in. It makes it easier to style later on, in addition to making the code easier to read. |
| <span> … </span> | This command allows you to style text easier. |
| <p> … </p> | This is where you put your main content in. The p stands for paragraph. |
| <table> … </table> | This allows you to put a table in, like this. |
Now, the rest is css.
| html{…} | This tells the browser the general style of the website. |
| background: url("https://farm1.staticflickr.com/563/20607701226_4eaa5e3458_k.jpg") no-repeat fixed ; | This tells the browser that the background image is at https://farm1.staticflickr.com/563/20607701226_4eaa5e3458_k.jpg. |
| font-size: 1em; | This allows the website to be responsive, because if it's easier sizing. I recommend that you use this one - I had the least problems with it. |
| @media screen and (max-width: 400px) {…} | This tells it to restyle differently based on the screen size. In this case, if the window width is less than 400 pixels, it will use a different set of styling. |
| color: white; | This command allows me to make all the text white. |
| transition: all 0.35s ease-out; | This causes an effect with the header when you resize the page. Try it! |
| font-family: 'Roboto Slab', serif; | This will change to font of my text. In this case, it will change it to Roboto Slab |
| a.button:hover {…} | This command allows you to style when you hover over the buttons. |
| text-align: center; | This allows me to center the text. |
| line-height: 0.421em; | This allows me to set the line height. |
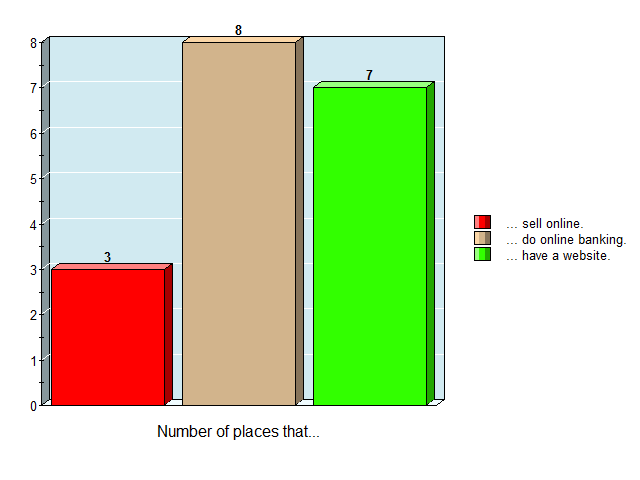
Also, always make sure you are using the latest version in order to prevent bugs. All eight businesses I surveyed had relatively up-to-date hardware and software. Here is a picture showing what they used it for.